|
Matching Material Matters
 When welding
thermoplastics,
one of the
key components is the
material itself. For as
long as plastic welding
has been around many
people do not understand
the basics. Webster�s Dictionary definition of welding:
to unite (surfaces) by softening them with heat.
When welding
thermoplastics,
one of the
key components is the
material itself. For as
long as plastic welding
has been around many
people do not understand
the basics. Webster�s Dictionary definition of welding:
to unite (surfaces) by softening them with heat.
The number one rule of welding thermoplastics is you
must weld like-plastic-to-like-plastic. In order to get a
strong, consistent
weld it is necessary
to make sure your
substrate and your
welding rod are
identical: for instance,
Polypropylene to
Polypropylene,
Polyurethane to
Polyurethane,
Polyethylene to
Polyethylene, etc.
Polypropylene is
one of the easiest
plastics to weld
and is used for many different applications. PP has
excellent chemical resistance, low specific gravity, high
tensile strength and is the most dimensionally stable
polyolefin. Proven applications using PP are plating
equipment, tanks, ductwork, etchers, fume hoods and
scrubbers, and orthopedic. In order to weld PP the welder
needs to be
at approximately
572�F:
determining
your temperature
will
depend on
which welder
you purchase.
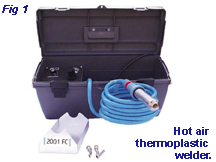
Using a hot
air thermoplastic
welder
(Fig. 1) with a 500 watt 120 volt heating element, the
air regulator should be set at approximately 5 p.s.i. and
the rheostat at 5.
 By doing this you should be in the
vicinity of 572�F.
By doing this you should be in the
vicinity of 572�F.
Another fairly easy
plastic to weld is
Polyethylene. The most
important rule about
welding Polyethylene is
that you can weld low to
high but not high to low.
Meaning, you can weld
Low Density Polyethylene welding rod to High Density
Polyethylene sheet but not vice versa. The reason being is
quite simple: the higher the density, the more difficult it
is to break down the components to weld. If the components
cannot be broken down at the same rate then they
cannot join together properly. Other than making sure
your densities are compatible. Polyethylene is a pretty
easy plastic to weld. Polyethylene is impact resistant, has
exceptional abrasion resistance, high tensile strength, is
machinable and has low water absorption. Proven applications
for PE are bins and liners, tanks, laboratory vessels,
cutting boards and slides. To weld LDPE you need to
have approximately 518�F, regulator set at approximately
5 ďż˝ to 5 ďż˝ and the rheostat at 5. Like PP, HDPE
is weldable at 572�F.
PVC, Polyvinyl Chloride, is a plastic that can be
extremely temperamental, however, it is an extremely
useful material. PVC has excellent resistance to corrosion,
weather and impact, is an excellent thermal and
 electrical insulator and is self-extinguishing. Proven applications
for PVC are plating equipment, tanks and liners,
ductwork, etchers, fume hoods and scrubbers. When
welding PVC, if you have your temperature too high the
material will char, if it is too low it will not weld. Because
of the chloride in the material it is necessary to break it
down. To do this you need to score the surface area you
want to weld and then
using a thinner such
as MEK, Methyl Ethyl
Keytone, to clean the
surface.
electrical insulator and is self-extinguishing. Proven applications
for PVC are plating equipment, tanks and liners,
ductwork, etchers, fume hoods and scrubbers. When
welding PVC, if you have your temperature too high the
material will char, if it is too low it will not weld. Because
of the chloride in the material it is necessary to break it
down. To do this you need to score the surface area you
want to weld and then
using a thinner such
as MEK, Methyl Ethyl
Keytone, to clean the
surface.
 Again, like PP
and HDPE, PVC needs
572�F to weld. As a
side note, PVC is the
exception to the like-plastic-
to-like-plastic
rule. It is possible to
weld PVC to acrylic
and vice versa.
Again, like PP
and HDPE, PVC needs
572�F to weld. As a
side note, PVC is the
exception to the like-plastic-
to-like-plastic
rule. It is possible to
weld PVC to acrylic
and vice versa.
Prior to welding
thermoplastics, there are a few simple steps that need
to be taken to ensure a proper weld. Clean all surfaces, including the welding rod,
with MEK or a similar solvent.
Groove the substrate
large enough to accept the
welding rod (Fig. 2) and cut
the end of welding rod to a
45ďż˝ angle. Once the welder
has come to temperature,
you need to prep the substrate
and the welding rod.
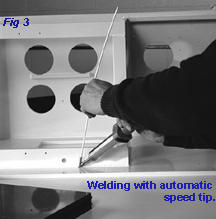
By using an automatic
speed tip (Fig. 3) a lot of
the prep work is done for
you. Holding the welder
about an inch above the
substrate, insert the welding
rod in the tip and move it in an up and down motion
three to four times. Doing this will heat the welding rod
while heating the substrate. An indication the substrate
is ready to be welded is when it starts getting a fogging
effect�similar to blowing on a piece of glass. Using firm
and consistent pressure, push down on the boot of the
tip. The boot will push the welding rod into the substrate.
If you choose to, once the welding rod adheres to
the substrate you can let go of the rod and it will automatically
pull itself through.
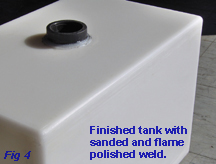
Most thermoplastics are sandable and the strength of
the weld will not be affected when
sanded. Using 60 grit sandpaper,
sand off the top part of the welding
bead, then work your way up
to 360 grit wet sandpaper to get a
clean finish. When working with
Polypropylene or Polyethylene it is
possible to regain their glossy surface
by lightly heating the surface
with a yellow open flame propane
torch Normal Fire Safety procedures
should be followed. Once
these steps are completed, you
should have a weld that looks similar
to the photo (Fig. 4).
Keeping the above tips in mind,
welding thermoplastics can be a fairly easy process to
learn. For other procedures and standards, contact your
local distributor.
Written by Paige D. Bowen, Marketing Director for
Seelye, Inc., manufacturers of a full line of hot air/gas
welders.
For more information, contact Seelye, Inc., 333C
Enterprise Street, Ocoee, FL 34761, 800-258-2936/407-656-6677, Fax: 407-656-5244, E-mail: seelyeinc@aol.com, Web: www.seelyeinc-orl.com.
|