|
Drilling and Proper Handling and Maintenance of Acrylic Sheet
Acrylic sheet can be drilled using commercially available power driven equipment, such as portable drills, drill presses, lathes, or automatic multiple-spindle drilling units.
Drill bits manufactured specifically for plastics work best when drilling acrylic sheet. However, metal working, high-speed twist drill bits can be used with minor bit modification. These drill bits are made to bite into metal when pushed. If used as is, metal working drill bits will chip acrylic sheet as well as cause other damage. They must be reground in order to scrape instead of biting or gouging the sheet.
Follow these steps for modifying standard metal working twist drills to work with plastics:
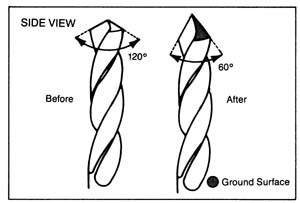
1. Grind the tip angle (usually a relatively flat 120°
) to a sharp 60 - 90°
. This sharp angle allows the bit to easily enter and exit acrylic sheet without chipping.
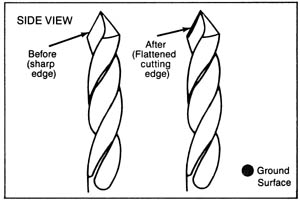
2. Grind the cutting edge, flat, to a 0 - 4°
rake angle. This cutting edge should scrape acrylic sheet, not gouge it.
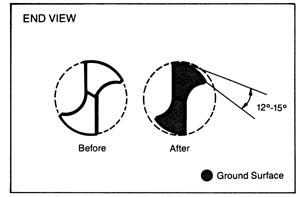
3. Grind away the surface behind the cutting edge to clearance angles of 12 - 15°
. This back relief reduces metal-to-plastic contact and heat build-up.
Large diameter (>5/8" [16mm]) drill bit tips should be ground to a point, thus reducing the force required to start a hole. Melting, burning, and chipping will occur unless the drill bits are true. Correctly modified bits operated at proper speeds will create two continuous spiral strips as the bit passes evenly through the acrylic sheet.
Drilling Procedures
Be sure to follow manufacturer safety recommendations for equipment and materials used with acrylic sheet products.
When drilling, hold the work piece firmly or clamp it to the worktable. Backup the piece being drilled with acrylic sheet or plywood to prevent chipping or blowout of the bottom surface. This allows the drill bit to continue into solid material as it penetrates the bottom surface. Allow the bit to enter the material using a slow feed rate. Slowing the feed rate as the bit exits the bottom surface prevents chipping.
When drilling a stack of acrylic sheet (1/4" thick or greater), use water as a cutting fluid. The water acts as a coolant, helps to reduce heat build up, and creates holes with smoother walls.
Holes that may be subject to force from screws or bolts should be deburred with a countersink. Zero flute countersinks work well for countersinking and deburring holes in acrylic sheet. If a countersink is unavailable, use a drill of larger diameter than the hole, and deburr the rough edge on the exit side of the hole (the side where the drill came through the sheet).
Suggested Drill Speeds
Use the following speeds as a guideline on equipment that allows variation of the rotational speeds:
|
DRILL DIAMETER |
SPEED (RPM) |
|
1/8" (3 mm) |
3,500 |
|
3/16" (4.5 mm) |
2,500 |
|
1/4" (6.0 mm) |
1,800 |
|
3/8" (9.5 mm) |
1,200 |
|
1/2" (12.7 mm) |
900 |
|
5/8" (16.0 mm) |
700 |
|
1" (25.4 mm) |
450 |
This table provides a starting point but the optimum RPM will also depend on the feed rate, depth of the hole being produced and the finish requirements. In general, the RPM’s should be lowered if melting or whitening is occurring and raised if chipping is occurring. Shallow holes are less prone to melting due to easy chip removal and may permit higher RPM’s. Deep holes are more likely to experience melting. For deep holes use a coolant and consider peck drilling, drilling the hole in steps and removing the bit periodically to clean chips. In higher volume or automated operations, a continuous air stream directed at the drill bit can provide cooling and enhance chip removal, thereby reducing melting.
Use a circle cutter when drilling a hole in acrylic sheet greater than 1" (25.4 mm). The cutter bit must be modified to accommodate the acrylic sheet properties so that the tip will scrape, not gouge, the sheet.
Caution must be taken. A circle cutter should only be used in a drill press with the acrylic sheet securely clamped to the machine table. Never attempt to use a circle cutter with a hand-held electric drill. A drill press provides the necessary uniform pressure and constant positioning essential for safe drilling of quality holes. A cutting speed of approximately 400 RPM is recommended, feeding slowly when starting and exiting the hole. Feed at a rate that allows the cutter bit to form a continuous strip. Use water as a coolant. Water also makes hole walls smoother.
TROUBLE SHOOTING
|
PROBLEM |
CAUSE |
SOLUTION |
|
Chipping |
Feed rate too fast
Bit rake angle too large
Sheet vibration
Drill bit wobble |
Reduce feed rate
Rake angle should be 0-4°
Clamp sheet tightly using solid backing
Replace bit or chuck |
|
Melting |
Feed rate too slow
RPM too high
Heavy chip load
Insufficient coolant
Clearance angle too small
(not enough back relief) |
Increase feed rate
Reduce RPM
Clear chip buildup
periodically
Increase bit twist angle
Increase coolant supply
Regrind drill bit to a 12-15°
clearance angle |
|
Irregular Hole |
Drill bit is not true
Bent drill bit
Worn chuck
Worn spindle |
Regrind drill bit
Replace bit
Replace chuck
Replace spindle or spindle bearings |
Proper Handling and Maintenance of Acrylic Sheet
When handling and maintaining acrylic sheet, following a few simple guidelines will ensure the best results for beautiful, unscratched acrylic surfaces.
Storage
To protect acrylic sheet from dirt and moisture, skids and cases are shipped with polyethylene film overwrap. Make sure to leave this overwrap intact. Folding and re-taping the overwrap after it has been opened will minimize warpage which can result from moisture absorption.
Ideally, acrylic sheet should be stored almost vertically in special racks with plywood panels for full support where sheets can lean at about a 10°
angle. If stored horizontally, sheets must be clean because the weight of the material can cause dirt or chips to pierce the protective masking, thereby scraping or indenting the sheet. When stacking various sizes horizontally, make sure to put the larger sheet on the bottom to avoid unsupported overhang.
Finally, keep acrylic sheet away from heat sources, such as radiators or steam pipes, which can deform or soften the sheet. Avoid placing acrylic sheet near spray painting booths or exposing it to solvent vapors which can penetrate the masking and damage the sheet’s surface.
Marking On Masking
Acrylic sheet is manufactured with paper or polyethylene film masking, on both sides, to protect against scratching during storage and handling. Almost any writing tool, such as a pencil or ballpoint and felt tip pen, will mark paper masking. Marking polyethylene masking requires grease pencils or special felt tip markers.
Removing Masking
Acrylic sheet masking should be left in place during most fabrication operations. It can be removed, if necessary, for intricate detail work or in line bending and thermoforming operations.
Exposure to sunlight or moisture can make masking removal very difficult. If sheet will be exposed to the outdoors the masking should be removed immediately after installation. Old paper masking with hardened adhesive can be moistened with aliphatic naphtha, hexane, or kerosene to ease removal. Wash away oily solvent residue immediately. Do not use gasoline or sharp-edged objects, such as razor blades. Store unmasked acrylic sheet in the original shipping cartons and avoid unnecessary handling.
Washing
Wash acrylic sheet with a solution of mild soap or detergent and lukewarm water. Use a clean, soft cloth and apply light pressure. Rinse with clean water and blot dry with a damp cloth or chamois. Do not rub the sheet with the cloth or chamois when drying as this can cause scratching and could generate static charge.
To remove grease, oil, or tar, use a good grade of hexane, aliphatic naphtha, or kerosene, in accordance with manufacturer recommendations. Never use window-cleaning sprays, kitchen scouring compounds, or solvents like acetone, gasoline, benzene, alcohol, carbon tetrachloride, or lacquer thinner. These substances can scratch the sheet’s surface and/or attack the sheet, resulting in crazing.
There are also special cleaning cloths available (such as 3M Scotch-Briteä
High Performance Cleaning Cloth) that are very effective at removing fingerprints and modest surface smudges without the need for cleaning solutions.
Dusting
Dust with a soft, damp cloth or chamois. Dry or gritty cloths may scratch the sheet’s surface and create a static electric charge.
Polishing
Occasionally, polish acrylic sheet with a good plastic cleaner to protect and maintain its surface gloss. Apply a thin, even coat with a soft, clean cloth and polish lightly with cotton flannel. Wipe with a damp cloth to help eliminate electrostatic charges, which can attract dust particles.
Neutralizing Static Electricity
Acrylic sheet can develop a static electrical charge during handling and processing. This occurs on the sheet’s surface when the film or paper masking is stripped off. Static electricity will attract airborne or nearby workstation particles, such as dust and chips, and hold them tightly to the sheet’s surface. Since the sheet must be dirt-free before bending, painting, or thermoforming operations, an additional procedure is required to temporarily eliminate the electrical charge on the surface.
Ionizing air guns work best for this procedure. These guns provide a stream of compressed air that effectively neutralizes static charge, which holds dirt to the surface. By using ionized air to clean surfaces, acrylic sheet can be directly heated, painted, or otherwise processed without additional cleaning. In addition, the appearance of painted and/or silk-screened sheet is greatly improved with the elimination of static charge.
Commercially available anti-static cleaners for plastics reduce static electricity and dust attraction. Wipe acrylic sheet with a soft, damp cloth or chamois to keep its surface dust free between cleaning applications. Many of these cleaners leave behind invisible residue. They are not suitable if the sheet will later be painted or coated.
Removing Scratches
Remove fine scratches by applying a plastic scratch remover to a soft flannel pad and rub. When the scratches have disappeared, clean up the residue and polish. For deep scratches, sand lightly with 400-grit (wet or dry) sandpaper. Use plenty of water and rinse frequently. Then buff with a clean muslin wheel and a high-quality polishing compound. To achieve the highest gloss, use a clean-up wheel made of soft cotton or flannel sections with no compound. An electric drill with a buffing wheel will give good results.
NOTE: Acrylic sheet is a combustible thermoplastic. Precautions should be taken to protect this material from flames and high heat sources. The information and statements contained herein are not to be taken as warranty or representation for which CYRO assumes legal responsibility nor as permission, inducement, or recommendation to practice any patented invention without a license. Users should undertake sufficient verification and testing to determine the suitability for their own particular purpose. Be sure to follow manufacturer’s safety recommendations for equipment and materials used with acrylic sheet.
For more information, contact Grant LaFontaine, Sheet Products Technical Service Manager for CYRO Industries. He can be reached at CYRO Industries, 100 Enterprise Drive, Rockaway, NJ 07866-5055, 800-631-5384, Fax: 973-442-6117, Web: www.cyro.com.
|