|
ROUTING: Real World Routing Solutions
This article is the last of our four
part series designed to bring to light
some common routing problems and
the tooling and/or process changes that
became the solutions to the problems.
As more and more CNC
routers are sold for the purpose
of machining plastics,
companies are running into problems
that never existed when they
were hand-finishing or machining
plastics and other materials. The scenarios
here look at four real-world problems that happened
at fabricators in the United States and the solutions
that were found.
Scenario 10
Material Cut: Aluminum skinned acrylic
Product: Large decorative letters for sign displays
Router Type: 3-axis CNC
Feeds & Speeds: 18,000 rpm at 60
ipm
Initial Tooling: 1/4-inch upcut spiral
“O” flute for hard plastics
Problem: Aluminum chips were welding
to the acrylic.
What happened with this fabricator
is a very common problem in the signage
and point-of-purchase industries.
A favorite material used for sign displays
is a clear or colored acrylic covered
on one side with a thin sheet of
aluminum that is attached with glue.
This material is cut out for displays
and letters and a premium finish is
required on both the top (aluminum)
surface and the edges of the material
(the acrylic).
In this particular application, the
material was 3/8-inch-thick acrylic
with a 0.015-inch aluminum skin. The
fabricator was machining the material
with the aluminum side down for better
hold-down and surface finish and
had already selected the correct tool
for the job. The problem was that as
the aluminum and its attached adhesive
were cut and the chips flowed
through the tool’s flute, the chips
would heat up and weld or stick to the
acrylic. This required a hand finishing
operation that the fabricator
was looking to remove from the
process.
This scenario is similar to a situation
written about in the last issue
in which a fabricator was cutting letters
in the same type of material with a 3/16-inch diameter
cutter. In that instance, switching to a tool with better
geometry was able to solve the problem. In this case however,
the glue and aluminum weren’t as well behaved and
the machinist was already using the optimal geometry.
The solution for this problem was to use a modified two pass
system for machining the part.
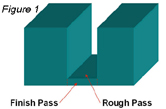 The aluminum side remained face down. The first pass
of the cutter was set at a depth of 0.030 inch above the
aluminum/acrylic interface and was set to leave the part
0.015 inch oversized.
This enabled
the cutter to remove
the bulk of the
acrylic material without
cutting into the
soft aluminum or the
glue line. The second
pass was machined
at full depth and onsize.
The aluminum side remained face down. The first pass
of the cutter was set at a depth of 0.030 inch above the
aluminum/acrylic interface and was set to leave the part
0.015 inch oversized.
This enabled
the cutter to remove
the bulk of the
acrylic material without
cutting into the
soft aluminum or the
glue line. The second
pass was machined
at full depth and onsize.
This gave a
clean cut to the aluminum and acted as a finish pass to
the acrylic without generating an excessive amount of
heat or leaving a line at the depth step (Figure 1).
Because the finish of the first pass was inconsequential
and the finish pass was removing so little material, the
feed speeds were increased to 250 ipm from 60 ipm and
the total cycle time was less than the original process.
This method eliminated the hand finishing operation,
reduced the cycle time and increased the cutter life. A
win-win situation.
Scenario 11
Material Cut: Cast acrylic
Product: Display cases
Router Type: 3-axis CNC
Feeds & Speeds: 18,000 rpm at 160 ipm
Initial Tooling: 1/4-inch upcut spiral “O” flute for hard
plastics
Problem: Edge finish required multiple polishing operations
after routing
This was a case of too much material for too little tool.
 The company was using a 1/4-inch diameter cutter with
optimal geometry for cutting 1/2-inch thick cast acrylic. In
many cases this is a perfectly acceptable method of
achieving a premium edge finish if the equipment
and fixturing is well maintained and very
solid. Unfortunately for this company, time had
taken its toll and the equipment did not have
the rigidity required to remove that depth of
material and still maintain a premium edge finish.
Even with the machine reprogrammed for
a rough and finish pass, the finish did not
improve enough.
The company was using a 1/4-inch diameter cutter with
optimal geometry for cutting 1/2-inch thick cast acrylic. In
many cases this is a perfectly acceptable method of
achieving a premium edge finish if the equipment
and fixturing is well maintained and very
solid. Unfortunately for this company, time had
taken its toll and the equipment did not have
the rigidity required to remove that depth of
material and still maintain a premium edge finish.
Even with the machine reprogrammed for
a rough and finish pass, the finish did not
improve enough.
The second attempt to solve this problem
was to use a multi-fluted acrylic finishing tool.
In many instances, adding flutes can lead to an
increase in surface finish, but it can be at the
expense of heat buildup and tool life. The 3-
flute finisher was used as a finish pass tool
after the single flute spiral removed the bulk of
the material. Unfortunately, this still did not
produce the desired edge quality.
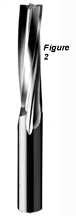
The final solution was to use a 1/2-inch diameter
acrylic finishing tool and to take a single pass (Figure
2). The added stability of the 1/2-inch diameter combined
with the increased surface speed of the cutter edges produced
the premium edge the company was looking for. By
changing their fixturing and programming, the company
eliminated two of the polishing operations.
Scenario 12
Material Cut: Thermoformed acrylic
Product: Display rack
Router Type: 3 1/4 hp hand router
Feeds & Speeds: 18,000 rpm and hand fed
Initial Tooling: 3/16” single edge “O” flute for
plastics (Figure 3)
Problems: Edge finishes were inconsistent
The 3/16” diameter
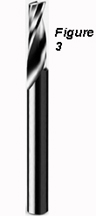 tool being used by hand
was producing varying finishes depending on
the operator running the material. Depending
on the force and feed rate applied by the operator,
the bits were either breaking, clouding
the edge, or cratering the material. The solution
was to replace the 18,000 rpm router with
a smaller laminate trim router running at
28,000 rpm. The increased surface footage
allowed the cutter to feed more easily and the
edge finishes were produced with a much more consistent
result.
tool being used by hand
was producing varying finishes depending on
the operator running the material. Depending
on the force and feed rate applied by the operator,
the bits were either breaking, clouding
the edge, or cratering the material. The solution
was to replace the 18,000 rpm router with
a smaller laminate trim router running at
28,000 rpm. The increased surface footage
allowed the cutter to feed more easily and the
edge finishes were produced with a much more consistent
result.
Scenario 13
Material Cut: ABS and acrylic
Product: Awards
Router Type: 3-axis CNC
Feeds & Speeds: Variable
Initial Tooling: 1/8-inch diameter spiral “O” flute
Problem: Tools were breaking when materials were
switched
In many cases, router operators feel comfortable with a
particular tool and do not want to be bothered with a
setup change or the expense of testing and operating multiple
tools. This case was no exception. The operator was
very happy with the finish that was generated by the 1/8-
inch spiral “O” flute in both 3/8-inch
thick acrylic and 1/16-inch thick ABS
(Figure 4). Unfortunately,
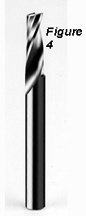 the tools kept
breaking when they were used to
machine the thin ABS.
the tools kept
breaking when they were used to
machine the thin ABS.
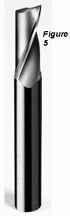
The problem originated from the fact
that the cutting edge length (1/2 inch)
required for the acrylic was too long for
the ABS. By using the same type 1/8
inch diameter spiral “O” flute tool with a
1/4 inch cutting edge length, the breakage
problems were eliminated (Figure 5).
The operator was
 able to use the same
tool for both jobs by taking multiple
passes (at higher feed rates) on the
thicker acrylic material without going
through the multiple setups.
able to use the same
tool for both jobs by taking multiple
passes (at higher feed rates) on the
thicker acrylic material without going
through the multiple setups.
This article is the last in a series
describing actual routing problems and the tooling, fixturing
and programming methods used to solve them. The
points that should be taken from these articles are:
Pick the Right Tool for the Job: The single most avoidable
mistake that users of CNC routers make is picking the
wrong tool. There are hundreds of tools available for cutting
hundreds of different types of plastics. Diameter,
geometry, chip evacuation and flute count are all variables
that need to be considered for each machining job.
Employ Solid Fixturing: It is difficult to achieve premium
edge finishes (measured in millionths of an inch) if the
fixturing allows the parts to move a few thousandths of an
inch. This is a critical issue and should be evaluated for
each job setup.
Be Willing to Change Programs: If the finished part
parameters are not acceptable or optimal after selecting
the correct tool and fixture, the answer can frequently be
achieved through programming. Whether it is a rough/finish
pass combination, multiple depths of cut, conventional
or climb cutting, or changes in feeds and speeds, there
are many options available to increase part quality and
throughput.
If these three issues are evaluated and solved, productivity,
quality and efficiency should be greatly improved.
For more information, click on the author biography at the top of this page.
|