|
Polishing and Bending See-Throughs
Acrylic sheet can be cut,
shaped, finished and
formed. How well and
how efficiently you handle these
basics will, in large part, determine
your success. We all know
our customers are more price
and quality conscious than ever
before.
Technology is rapidly increasing
efficiencies for plastic fabricators.
Yet with all the technological
gains, the basics remain
the same. You can cut more
pieces, with tighter tolerances,
faster than ever but you must
still finish the edges, peel
masking, bend and package.
Efficiency gains at the finishing
and bending operations will make you more competitive
and ultimately add to your bottom line. Ask yourself
the following:
-
Does your equipment provide the versatility to handle
both large and small jobs with minimal setup time?
-
Does your bending equipment provide heat from both
above and below the work to reduce cycle times?
-
Does your edge finishing system polish and produce
matte finish bondable edges with the same piece of
equipment?
-
If you completed the last job in half the time, how would
that have affected your profit?
Automation
The majority of expenses
for any job relate to
the time it takes to complete
the job. Through
automation, efficiency
gains may be realized on
several fronts. Cost reductions,
productivity increases
and quality improvements
are three
that can have an immediate
and positive impact to
your bottom line. The following
outline shows several
areas for potential
profit improvements.
Efficiency Gains -
One operator can manage
multiple units
-
Current operator has time
for other tasks
Cost Reductions-
Delay and/or avoid additional
Hiring
-
Reduce current payroll levels
Productivity Increases-
Increased production speed
-
Operator fatigue no longer a
production factor
Reduced Lead Times for
Customers-
Can lead to ability to take on
additional business
-
Creates customer loyalty
Quality Improvements-
Scrap reduction
-
Manufacturing consistency
Capital investments in automation to reduce these costs
and or gain efficiency are usually based upon a 24 month or
less return on investment (ROI). Serious consideration should
be given to the acquisition of equipment and or process
improvements that fall within these criteria.
Setup/Tool Change Procedures
An often underestimated part of any production environment,
and one that when monitored and controlled can produce
efficiency gains and
add profit, is setup and tool
change procedures. Time
spent between job setups
and scheduled or unscheduled
tool changes adds up
 quickly and associated
process costs become a
double edged sword. Not
only is your process in an
idle state at these times but
you are expending wage
resources during the downtime.
This must occur at
some point during the
process but the time duration
is certainly controllable.
quickly and associated
process costs become a
double edged sword. Not
only is your process in an
idle state at these times but
you are expending wage
resources during the downtime.
This must occur at
some point during the
process but the time duration
is certainly controllable.
Keep spare parts, tools and any necessary measuring instruments
as close to their relative machining process as possible.
The savings may not look like much in the short-term but
over time if you reduce set up and production times,
acquire versatile equipment, hire, train and empower good
people you will see a savings.
Consumable Tooling
Saving time and money here is a matter of watchful eyes.
Obviously a tool works best and produces superior quality
parts when
the tool is
new or just
sharpened.
All consumable
tools
have a fairly
finite life
expec tancy.
In most
instances
the wear
period is
predictable.
Once you
have established
the time pattern, remove the tool just before the failure
point. Removing the tool from service while it is still fairly
sharp will, in the long term, increase the life of the tool.
Less material from the tool itself will require removal to
bring the cutting edge back to optimum quality.
Different materials will cause your tooling, especially the
diamond tooling, to wear at varying time intervals. Harder
materials will result in longer tool life. Softer materials will
tend to roll over in a cutting process and gum up the edge of
a tool resulting in reduced tool life and inferior quality parts.
The manufacture of diamond polishing tools for plastics
is still mainly a human driven process. Much of the work is
completed by hand, so there will be some variation
between tools. The average life expectancy for the diamond
polishing tools is approximately 45-60 hours of use
between sharpenings and 8-10 sharpenings before the
inserts must be replaced.
Tool life for the diamonds is based upon working with
clear acrylic material. You will notice a better result with
cell cast materials over continuous cast or extruded materials.
Tool life will be reduced by one third to one half on
colored materials, especially smoke or black and on any of
the softer materials like impact modified, polycarbonates,
copolymers and PETG. Diamond tools have much the same
reaction as your saw and router tooling.
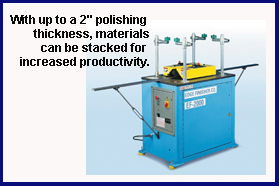
Another factor to consider in your production versus
quality equation is to stack or not stack material.
Obviously machining multiple pieces of any material simultaneously
is preferable to machining them singly; however,
you will sacrifice some tool life and edge quality in the
process. The loss is due to the many layers of film and or
paper masking through which the diamond must pass.
Best results are obtained when machining no more than 5
pieces of 1/8” or 3/16” and no more than 4 pieces of 1/4”
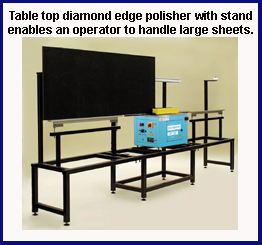
material. Placing two smaller capacity machines into service
can improve both efficiency and quality of your finishing
operations. The smaller units will use less valuable floor
space and the same operator can easily manage both.
Bending Sheet Materials
After all of your efforts from initial design, cut to size and
finishing; you have a great deal of time and money invested
in each part. Now you must bend your creation to its
final form - this is the point in your process where you clearly
want error-free performance.
Enter the variables of ambient temperature fluctuation,
relative humidity, process variation and operator differences
and your bending operations can present quite the
challenge. Of the many options from calrod to quartz,
straight nichrome wire will provide the most heat consistency
over distance for your process.
Setups with nichrome wire range from over simplification
(a length of wire stretched between two ten-penny nails
driven into a two by four) to the extremely complex.
Generally, an 18-gauge wire set into a 15mm-20mm wide
aluminum reflector will provide the best results for materials
up to1/4” in thickness. Support along the underside and
pressure from above the material adjacent to the heating
area will reduce warping and bowing. One of the most
important and sometimes least attended to aspects of the
bending process is the cooling fixturing. Heating materials
in a desired location
is ten percent of the
battle. The remaining
effort is expended
designing, building
 and adjusting
cooling jigs. Adding
insult to injury, time
and money is expended
constructing
a jig for a particular
job that may never
come around again. Consequently, the jig is either trashed
or thrown on a shelf to forever collect dust.
and adjusting
cooling jigs. Adding
insult to injury, time
and money is expended
constructing
a jig for a particular
job that may never
come around again. Consequently, the jig is either trashed
or thrown on a shelf to forever collect dust.
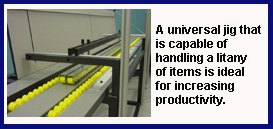
A universal jig that is designed to accommodate t-stands,
shoe risers, photo frames, sign holders and a litany of items
is ideal for increasing part quality. (Figure 2). Each new part
is placed into the jig, it moves the previous one forward
until the parts exit cooled and formed.
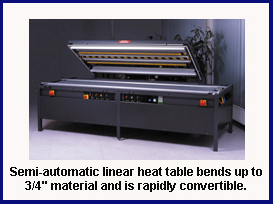
For optimum results and efficient cycle times, heat both
sides of the material simultaneously. If your current capability
allows heating from one side only, it is best to flip the
material over during the cycle to ensure even heat distribution
through the material.
Worth Mentioning
Bubble free polycarbonate bends: Heat from both sides,
lower the wire temperature and be patient! Always be sure
your material is fairly dry to prevent blistering.
Thin materials - .010 to .062 vinyl etc.: Use a Teflon®-
coated brass insert over the heating wire. You can then
place the material directly on the insert surface, heating a
narrow (1/16”) area of the material to produce sharp,
straight bends.
To reduce and/or eliminate the “dog ear” at the bend
point; block off the edges of your parts while they are over
the heating area. This will keep the edges a bit cooler than
the surface and, when bending the material, will tend to
flow toward the center and not out of the edge.
Adding Value
Customers need an education. Teach them about the different
processes you can use to ensure a part will look as
good on the hundredth day as it did on the first day. Yes, it
may cost a bit more but why should we feel the need to
apologize for pricing? Products of a superior quality do
cost a bit more and they are well worth the extra cost. You
know it, I know it, but do your customers know it?
Written by Edge Finisher Company, manufacturers and
suppliers of edge finishing, edge polishing and flame polishing
equipment and linear heat tables for plastics fabrication.
For more information, contact Edge Finisher
Company, 16 Stony Hill Road, Bethel, CT 06801, 800-625-5863, 203-796-7923, Fax: 203-796-7924, E-mail:
info.efc@blackstoneind.com, Web: www.edgefinisher.com.
|